How does DHT11 sensor work?
In this article, we are looking for how DHT series sensors work and how can we drive them without using any library. Especially about DHT11 sensor here in this content. DHT 11 is a very cheap way to measure temperature and humidty in embedded systems, like arduino or STM based development cards
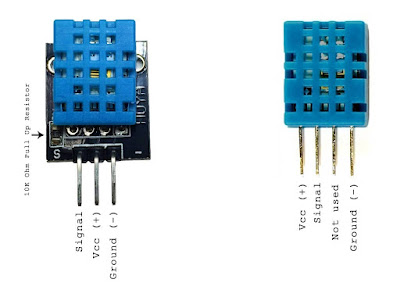
You can see two types of DHT11 sensor which one have 3 pins with a board, another is just sensor. Difference between two is just a pullup resistor, If you have alone one, you should put a 10K resistor, signal pin to VCC pin to made them the same, there is no any difference except alone one has an unsused pin !?
This Sensor can be used with Adafruit's DHT sensor library, with a requirement which is Adafruit's Unified Sensor Library. You can find them Library Manager on Arduino IDE.
It's very easy! Just click Tools * Manage Libaries, you will face with Library manages which has a text box Fill your search... written. Text there DHT Sensor and find DHT Sensor Library published by Adafruit, and install, If you are lucy it will be asked you to install neccessary libraries together (it means Unified Sensor Library). If not you can also search unified sensor library expression on search box and find and install, Thats all!
DHT11 Arduino wiring diagram

the code you should write in Arduino IDE is :
#include "DHT.h"
#define DHTPIN 2     // Digital pin connected to the DHT sensor
#define DHTTYPE DHT11
DHT dht(DHTPIN, DHTTYPE);

void setup() {
  Serial.begin(9600);
  Serial.println(F("DHTxx test!"));
  dht.begin();
}

void loop() {
  // Wait a few seconds between measurements.
  delay(2000);

  // Reading temperature or humidity takes about 250 milliseconds!
  // Sensor readings may also be up to 2 seconds 'old' (its a very slow sensor)
  float h = dht.readHumidity();
  // Read temperature as Celsius (the default)
  float t = dht.readTemperature();
  // Read temperature as Fahrenheit (isFahrenheit = true)
  float f = dht.readTemperature(true);

  // Check if any reads failed and exit early (to try again).
  if (isnan(h) || isnan(t) || isnan(f)) {
    Serial.println(F("Failed to read from DHT sensor!"));
    return;
  }

  // Compute heat index in Fahrenheit (the default)
  float hif = dht.computeHeatIndex(f, h);
  // Compute heat index in Celsius (isFahreheit = false)
  float hic = dht.computeHeatIndex(t, h, false);

  Serial.print(F("Humidity: "));
  Serial.print(h);
  Serial.print(F("%  Temperature: "));
  Serial.print(t);
  Serial.print(F("°C "));
  Serial.print(f);
  Serial.print(F("°F  Heat index: "));
  Serial.print(hic);
  Serial.print(F("°C "));
  Serial.print(hif);
  Serial.println(F("°F"));
}
and you can see results by opening the Serial Monitor => Tools * Serial Monitor or you like to use your keybord CTRL + SHIFT + M keyboard combination is for you!
This is an easy way to use the sensor, If you want to learn how DHT 11 sensor works and you are an adventurer :) keep reading! your episode is about to start!

Comments
Post a Comment
You can share your experience, or ask anything about the topic, Let's write ;)